Monday, April 2, 2012

Refurbishing Steel Master Cylinder Reservoir Caps

I've had success refurbishing rusted English Ford steel reservoir caps with solder.

Refurbished Reservoir Cap
These should be sand blasted first to get rid of the rust and to observe the condition is void of any major dents and holes. It also preps the cap for solder.

Use a propane torch and 50/50 solder ( lead/tin ) used for repairing copper radiators.

Clean the steel cap with acid flux. Heat the cap hot enough so solder will flow once it's touched to the cap. Careful not to over heat the cap. Once the cap is covered completely with a thin coat of solder including the threads but not the inside, re-heat the cap and wipe with a cotton cloth to smooth or a small tooth brush size wire brush. Then use a bit of metal polish. It may take a bit of practice but the outcome is worthwhile.  This will not prevent the cap from rusting so it would help to wipe it with WD-40 once a month or sooner.  Make sure the vent hole is still open.

Aluminum caps that incorporate an inner steel insert can be cleaned with a small metal brush to remove the rust and wiped clean with a cotton cloth and a bit of WD-40.

Sunday, March 25, 2012

Rear Brake Shoe Spacers

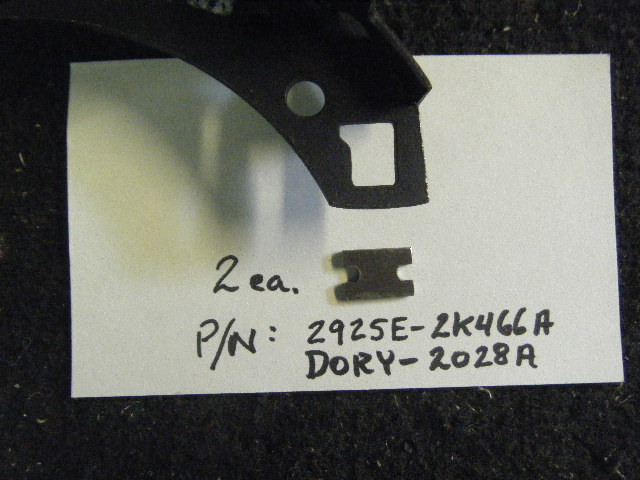
There should be a rear brake shoe spacer for the Cortina/Lotus/Corsair MK1 GT ( 10/65>) , all Cortina MK2 and EnFos of that era that incorp. the auto. adj. wheel for the b/shoes. Without it the handbrake comes out too far even after tightening the H/brake cable also the lever won't turn the auto. adj. wheel properly. Sometimes these spacers were not reinstalled after replacing the shoes.

P/N: DORY-2028A for the Cortina MK2. and P/N: 2925E-2K466A for the
Cortina/Lotus/Corsair (10/65>) which is not listed in the parts book.

I've reproduced spacers from the original part if anyone has them missing.

Friday, March 16, 2012

English Ford Neoprene Support Straps

Reproduced neoprene support straps for English Ford exhaust systems and rear axle housing handbrake cables are now available in the parts section.
They are 1/4" neoprene re-inforced with 4 sheets of heavy duty cloth much more durable than OEM straps.
Original EnFo straps were 1/4" rubber re-inforced matting which would weaken and tear after a couple of years.
These can be purchased in straps only or with original attached hardware using screw and lock nuts instead of rivets. Items with attached hardware are sold on exchange only.

Handbrake Rear Axle Link Support Straps/or with attachments for : Anglia 105E/123E, Prefect 107E, Cortina MK1 ( includes Lotus ).

Exhaust System Support Straps/or with attachments for : Anglia 105E/123E, Prefect 107E, Cortina MK1 ( includes Lotus ), Zodiac, Zephyr,Consul MK2.

Saturday, January 21, 2012

Tips on choosing the right electric fuel pump for your English Ford

There are plenty of good reasons for installing an electric fuel pump but choosing the proper one is very important and here's why:

At full-open throttle a motor requires about 1/2 lbs fuel every hour per h.p. A gallon of gasoline weights approx. 6 lbs. So if your engine makes 50 h.p. it will need a pump that supplies fuel at 8 gph. ( 50 x 1/2 ) = 25 lbs per hour then 25 divided by 6 = 8.1 gph.
An Anglia 100E/105E needs only 1.25 - 2.0 per sq inch of fuel pressure for its Solex carb to function properly.
Cortina 1200 / 1500 / 1600 requires 1.25 - 2.5 psi.
Cortina GT / Lotus ; 2.75 - 4.25 psi.
Any more than 8 psi can flood the carb. Installing an electric fuel pump of 150 gph @ 6-8 psi will need a fuel regulator to reduce the psi.
Since pressure ( psi ) and volume ( gph ) are inversely proportional "real world" flow rates will vary depending on driving conditions.
For Authenticity and preventive maintenance the original fuel pump can be left on and an in-line electric pump can be installed near the fuel tank with an on/off switch.

Saturday, November 5, 2011

1500 GT Inlet Manifold Drain Pipe

On the Cortina/Capri 1500 GT there is a 2-3mm hole at the base of the inlet manifold. Attached is a 7" extension tube ( p/n: 116E-9K272 ). Usually these pipes break off. The whole point of a drain pipe was to prevent a fire when the carb float valve sticks open ( otherwise the gas will drip onto the hot exhaust manifold without a tube ). The only time that happens is when the brass float has a pin hole preventing the float to rise or dirt is lodged between the needle/valve. The engine won't run anyway in that condition and draining excess fuel running down the side of the engine block doesn't make much sense.
The drain pipe or just the hole will cause engine hesitation and should be blocked off.

Thursday, September 22, 2011

English Ford 105E/107E/307E/309E Steering Damper kits

Steering dampers kits are produced for LHD English Ford Anglia, Prefect, and Thames models only. $140
These kits include all the brackets, hardware, new hydraulic damper and instructions. Similar to what was offered as an accessory through Ford of England parts catalog.

Even after rebuilding the front suspension and steering box the traverse or drag link will still shimmy a bit on rough roads. This can be felt on the steering wheel. Installing a steering damper from the body to the traverse bar eliminates vibration and shimming. Giving a smoother ride. It will not produce a heavy steering or an extra load on the suspension components.

Pete

Servicing English Ford Cortina MK1/2 Tachometers

Remove the Cortina tachometer from the shroud.

Disconnect the wires to the tach.

Twist the chrome bezel by hand to unlock and remove. That may be hard to do so lift the tabs slightly to ease movement.

Remove the two or three slotted screws from the back of the tach and remove base cover.

Locate the largest resister on the circuit board ( 150 ohm 1/2 watt - colors: brown/yellow/black ).
Apply an ohm meter across the resistor to check the value. If > 200 ohms replace it.
If ok, then locate a pot that has a slotted adj. screw on top.
Hook up the bare tach to the dash wiring ( lay it on the column under a rag for support )
Connect a timing light or such with an rpm reading to the engine. Start the engine.
Compare the rpm readings from the tach and T/L. Adjust the pot to the reading on the T/L.

Before attaching the casing to the tach. Drill a 1/4" hole in the casing that lines up to the pot.
That way you can adj. the tach with a screw driver without taking it apart.

Most English Ford tachs ( positive or negative grd ) will need adjusting because of age, unless it's new.

Pete