Monday, June 4, 2012

Rotary Star Door Latches


Figure 1
Figure 2
Figure 3
The rotary star mechanisms should be in good shape before starting this project. This work can be carried out on other similar English Ford latches.
Figure 4

Figure 5
Figure 1 is a worn, early Anglia 105E door latch.
After removing the arm spring, drill out the lever arm stud rivet just enough so that the washer will come off. Remove the two levers and spring washer. Turn over the latch and file down flush the stud rivet which now can be pulled out of the latch base plate.


Figure 4.  I've removed the arm from the worn lever on the left and welded it to the fabricated lever on the right. It was easier to make a new lever from the same material and thickness and cut off the lever arm off near the base of the worn lever with a hack saw and weld it to the new lever. Take care to attach the arm at the same angle and height as the original part.


Figure 5.  I chose to install a shoulder bolt and flush nut insert ( fig. 3 ) to hold the levers in place. Added epoxy on the bolt threads and filed down the nut a bit to make it more flush. The nut should be just tight enough to allow the levers to move freely by the return spring.
Another way would be to weld the thread of the shoulder bolt to the base and then file off excess weld.
  
Oil the star rotary bushing and movement levers and grease the lever wheel. Brush a coat of grease on the whole inside latch to prevent rust. If the spring is broken replace it with a similar tension spring. Squeeze the end of the springs to prevent the spring from coming loose.


Figure 2 is a rebuilt door latch.

Disclaimer:  This information is only meant for educational purposes.


Thursday, May 3, 2012

Dove Tail Door Striker Plates

" A door is only as good as it's lock". Strike plates or door strikes are the protective metal plates installed in the door jam that receives the latch or lock tongue when the door is closed. The ones in issue are the dove tail striker plates incorporating an aggressive toothed pattern on the bottom of the plate. This type is used on the Anglia 105E/123E, Consul, Zephyr, Zodiac and more. As English Fords from the 50's/60's continue to age, I'm seeing striker plate teeth wearing to a point of  safety concern. In those conditions the door needs to be slammed hard to close properly. In that case a new replacement is necessary. I've contacted many sources regarding the availability for new plates with no avail. So I decided to give it a try and repair the most promising plates. Note: To start with,  door latches need to be in good condition


Figure 1 and 3 plates are in good enough condition for repair. Figure 2 cannot be used for this type of repair. These are worn beyond a point of safety and the door will be in danger of flying open whilst the car is being driven at speed.

I've had success with using J-B weld epoxy. After rough sanding the worn area apply epoxy to plates to Fig 1 and Fig 3. Fill the cavity over flush in Fig 6. After the epoxy is dry file down until flush Fig 7. The epoxy filling is still holding to the plate tooth pattern on my Anglia 124E after a few months with little wear showing at the same time preventing any further wear on the tooth pattern. The filing may one day fall off but I'll just re-apply a new batch.

The Anglia 105E/123E sedan came with two styles of striker plates Fig 8: early type < 10/1962 and Fig 3 later type > 10/1962. Estate later > 6/1963. Fig. 4 are the early types. The L/H plate tooth pattern are solid while the R/H has a hollow front tooth. Fig 5 is the later type all hollow tooth. Be aware of these hollow tooth plates esp. if worn completely through the casting. REPLACE THEM.

Fig 8 are restored early type striker plates with new bumper rubber. Be sure that the door lock striker safety plate is installed p/n: E2093-AA-1 on both early and later striker plates.
Recommended Epoxy

Figure 1


Figure 2
Figure 3
Figure 4
Figure 5
Figure 6
Figure 7
Figure 8

Monday, April 2, 2012

Refurbishing Steel Master Cylinder Reservoir Caps

I've had success refurbishing rusted English Ford steel reservoir caps with solder.

Refurbished Reservoir Cap
These should be sand blasted first to get rid of the rust and to observe the condition is void of any major dents and holes. It also preps the cap for solder.

Use a propane torch and 50/50 solder ( lead/tin ) used for repairing copper radiators.

Clean the steel cap with acid flux. Heat the cap hot enough so solder will flow once it's touched to the cap. Careful not to over heat the cap. Once the cap is covered completely with a thin coat of solder including the threads but not the inside, re-heat the cap and wipe with a cotton cloth to smooth or a small tooth brush size wire brush. Then use a bit of metal polish. It may take a bit of practice but the outcome is worthwhile.  This will not prevent the cap from rusting so it would help to wipe it with WD-40 once a month or sooner.  Make sure the vent hole is still open.

Aluminum caps that incorporate an inner steel insert can be cleaned with a small metal brush to remove the rust and wiped clean with a cotton cloth and a bit of WD-40.

Sunday, March 25, 2012

Rear Brake Shoe Spacers

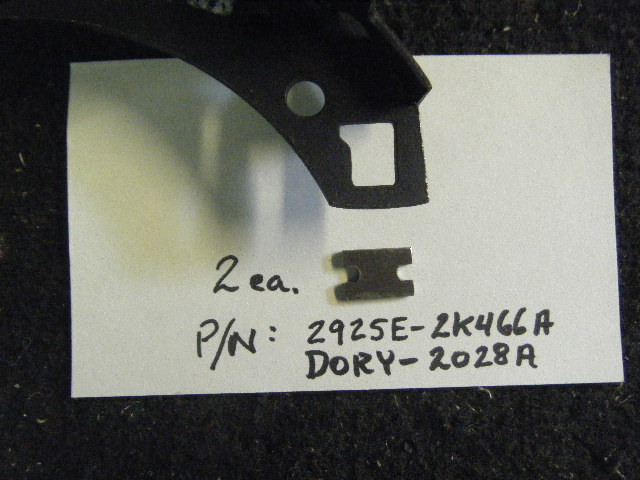
There should be a rear brake shoe spacer for the Cortina/Lotus/Corsair MK1 GT ( 10/65>) , all Cortina MK2 and EnFos of that era that incorp. the auto. adj. wheel for the b/shoes. Without it the handbrake comes out too far even after tightening the H/brake cable also the lever won't turn the auto. adj. wheel properly. Sometimes these spacers were not reinstalled after replacing the shoes.

P/N: DORY-2028A for the Cortina MK2. and P/N: 2925E-2K466A for the
Cortina/Lotus/Corsair (10/65>) which is not listed in the parts book.

I've reproduced spacers from the original part if anyone has them missing.

Friday, March 16, 2012

English Ford Neoprene Support Straps

Reproduced neoprene support straps for English Ford exhaust systems and rear axle housing handbrake cables are now available in the parts section.
They are 1/4" neoprene re-inforced with 4 sheets of heavy duty cloth much more durable than OEM straps.
Original EnFo straps were 1/4" rubber re-inforced matting which would weaken and tear after a couple of years.
These can be purchased in straps only or with original attached hardware using screw and lock nuts instead of rivets. Items with attached hardware are sold on exchange only.

Handbrake Rear Axle Link Support Straps/or with attachments for : Anglia 105E/123E, Prefect 107E, Cortina MK1 ( includes Lotus ).

Exhaust System Support Straps/or with attachments for : Anglia 105E/123E, Prefect 107E, Cortina MK1 ( includes Lotus ), Zodiac, Zephyr,Consul MK2.

Saturday, January 21, 2012

Tips on choosing the right electric fuel pump for your English Ford

There are plenty of good reasons for installing an electric fuel pump but choosing the proper one is very important and here's why:

At full-open throttle a motor requires about 1/2 lbs fuel every hour per h.p. A gallon of gasoline weights approx. 6 lbs. So if your engine makes 50 h.p. it will need a pump that supplies fuel at 8 gph. ( 50 x 1/2 ) = 25 lbs per hour then 25 divided by 6 = 8.1 gph.
An Anglia 100E/105E needs only 1.25 - 2.0 per sq inch of fuel pressure for its Solex carb to function properly.
Cortina 1200 / 1500 / 1600 requires 1.25 - 2.5 psi.
Cortina GT / Lotus ; 2.75 - 4.25 psi.
Any more than 8 psi can flood the carb. Installing an electric fuel pump of 150 gph @ 6-8 psi will need a fuel regulator to reduce the psi.
Since pressure ( psi ) and volume ( gph ) are inversely proportional "real world" flow rates will vary depending on driving conditions.
For Authenticity and preventive maintenance the original fuel pump can be left on and an in-line electric pump can be installed near the fuel tank with an on/off switch.

Saturday, November 5, 2011

1500 GT Inlet Manifold Drain Pipe

On the Cortina/Capri 1500 GT there is a 2-3mm hole at the base of the inlet manifold. Attached is a 7" extension tube ( p/n: 116E-9K272 ). Usually these pipes break off. The whole point of a drain pipe was to prevent a fire when the carb float valve sticks open ( otherwise the gas will drip onto the hot exhaust manifold without a tube ). The only time that happens is when the brass float has a pin hole preventing the float to rise or dirt is lodged between the needle/valve. The engine won't run anyway in that condition and draining excess fuel running down the side of the engine block doesn't make much sense.
The drain pipe or just the hole will cause engine hesitation and should be blocked off.